Create a Custom WVD Master Image
This lab involves building and updating base or golden images and may take several hours to complete. Please plan accordingly.
Exercise 1 - Create a new Virtual Machine (VM) in Azure
- In your Azure Portal, click on + Create a resource, and in the search field type Microsoft Windows 10.
-
Select Windows 10 Enterprise multi-session, Version 1909 and click Create.

- Complete the following on the Basics tab:
- Resource Group: Create New WVDLab-GoldenImage
- Virtual machine name: GoldenImage
- Size: Standard D2 v3
- Username:
<yourfirstname> - Password:
Complex.Password - Confirm password:
Complex.Password
- Complete the following on the Networking tab:
- Virtual Network: Select AD-VNet
- Subnet: Select AD-Subnet
- Click Review + create. Once validation passes, click Create.
Exercise 2 - Run Windows Update
- Click on Go to resource once the deployment is complete.
- RDP into your GoldenImage VM and run Windows update.
- Download and apply any updates, reboot as needed.
Exercise 3 - Install Office on a master VHD image
In this exercise you will learn how to install Office 365 ProPlus, OneDrive, and other common applications on a master virtual hard disk (VHD) image for upload to Azure.
- RDP into your GoldenImage virtual machine and download the Office Deployment Tool.
-
Using Notepad create and save configuration.xml on your desktop:
<Configuration> <Add OfficeClientEdition="64" Channel="Monthly"> <Product ID="O365ProPlusRetail"> <Language ID="en-US" /> <Language ID="MatchOS" /> <ExcludeApp ID="Groove" /> <ExcludeApp ID="Lync" /> <ExcludeApp ID="OneDrive" /> <ExcludeApp ID="Teams" /> </Product> </Add> <RemoveMSI/> <Updates Enabled="FALSE"/> <Display Level="Full" AcceptEULA="TRUE" /> <Logging Level=" Standard" Path="%temp%\WVDOfficeInstall" /> <Property Name="FORCEAPPSHUTDOWN" Value="TRUE"/> <Property Name="SharedComputerLicensing" Value="1"/> </Configuration>- This sample configuration XML will do the following things:
- Install Office from the monthly channel and deliver updates from the monthly channel when they’re executed.
- Use the x64 architecture.
- Disable automatic updates.
- Remove any existing installations of Office and migrate their settings.
- Enable shared computer activation.
- This sample configuration XML will do the following things:
- Open File Explorer, change the the Downloads directory, and run
officedeploymenttool_12624-20320. Complete a default installation. -
Open a command prompt, switch to
c:\users\jeffand enter the following command:Setup.exe /configure C:\Users\<yourfirstname>\Downloads\configuration.xmlInstallation can take 10-15 minutes to complete.
- Click on the Start menu and you should see Office applications listed.
Exercise 4 - Download and Install FSLogix
-
Return to Microsoft Edge and navigate to Download and Install FSLogix. Save the file to
c:\users\<yourfirstname>\downloads -
Switch to File Explorer, then navigate to
c:\users\<yourfirstname>\downloads. Double-click on the compressed file, then Compressed Folder Tools, then Extract All, then Extract.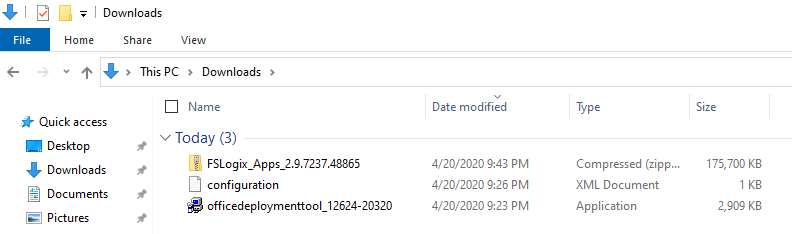
-
Navigate to the extraction folder, then x64 directory, then Release folder, and run FSLogixAppsSetup to install the FSLogix agent. Complete a default installation.
-
Navigate to Program Files > FSLogix > Apps to confirm the agent installed.
-
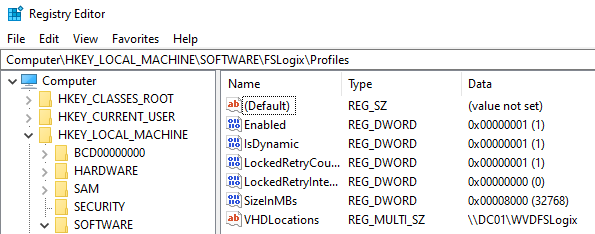
Open a Command Prompt and run RegEdit32 as an administrator. Navigate to Computer\HKEY_LOCAL_MACHINE\software\FSLogix\.
-
Open PowerShell and execute the following commands:
#Create the key New-Item -Path HKLM:\Software\FSLogix\ -Name Profiles –Force #Create Enabled Set-ItemProperty -Path HKLM:\Software\FSLogix\Profiles -Name "Enabled" -Type "Dword" -Value "1" #Create the VHDLocations New-ItemProperty -Path HKLM:\Software\FSLogix\Profiles -Name "VHDLocations" -Value \\DC01\WVDFSLogix -PropertyType MultiString -Force #Create the SizeInMBs Set-ItemProperty -Path HKLM:\Software\FSLogix\Profiles -Name "SizeInMBs" -Type "Dword" -Value "32768" #Create IsDynamic Set-ItemProperty -Path HKLM:\Software\FSLogix\Profiles -Name "IsDynamic" -Type "Dword" -Value "1" #Create LockedRetryCount Set-ItemProperty -Path HKLM:\Software\FSLogix\Profiles -Name "LockedRetryCount" -Type "Dword" -Value "1" #Create LockedRetryInterval Set-ItemProperty -Path HKLM:\Software\FSLogix\Profiles -Name "LockedRetryInterval" -Type "Dword" -Value "0" -
Return to Registry Editor, then select View then Refresh and confirm your settings:
-
Restart the virtual machine.