Lab 14: Create an Azure Files Share for FSLogix
In this exercise you will be creating an Azure Files share and enabling Active Directory authentication for use in your Windows Virtual Desktop tenant. You will then have user profiles be stored on Azure Files.
In order to complete this lab Azure Files authentication with on-premises AD DS is not available in West US. If your resources are located in this region, use East US for this lab, however please be mindful of the possible impact on performance and the cost of network transfers within a zone. Visit Regional availability for more information.
Exercise 1 - Create a storage account
Before you can work with an Azure file share, you have to create an Azure storage account. A general-purpose v2 storage account provides access to all of the Azure Storage services: blobs, files, queues, and tables. A storage account can contain an unlimited number of shares. A share can store an unlimited number of files, up to the capacity limits of the storage account.
To create a general-purpose v2 storage account in the Azure portal, follow these steps:
-
Sign in to the Azure Portal.
-
On the Azure portal menu, select All services. In the list of resources, select Storage Accounts.
-
On the Storage Accounts window that appears, click + Add.
-
On the Basics tab complete the following:
- Resource Group: WVDLab
- Storage account name:
<yourinitials>fslogixstorage (e.g. abcfslogixstorage) - Location: Choose the same Azure Region as your other resources
- Select Review + Create to review your storage account settings and create the account.
- Click Create.
Exercise 2 - Create an Azure file share
- When the Azure storage account deployment is complete, click Go to resource.
- On the Overview page for the new storage group, select File shares.
- On the File shares blade, click + File Share.
-
Name the new file share fslogixprofiles, enter 20 for the Quota and click Create.
Note: The file share quota supports a maximum of 5,120 GiB and can be managed on the File shares blade.
Exercise 3 - Enable Active Directory authentication for your storage account
To enable AD authentication over SMB for Azure file shares, you need to first register your storage account with AD and then set the required domain properties on the storage account. When the feature is enabled on the storage account, it applies to all new and existing file shares in the account.
Domain join your storage account
- Return or RDP into your domain controller.
- Download the AzFilesHybrid module within your domain controller, as the DC is domain joined to Active Directory.
- Open PowerShell with Administrator permissions and execute the following commands from your domain controller:
Remember to replace the placeholder values with your own values before executing the PowerShell commands.
#Change the execution policy to unblock importing AzFilesHybrid.psm1 module
Set-ExecutionPolicy -ExecutionPolicy Unrestricted -Scope CurrentUser

# Navigate to where AzFilesHybrid is unzipped and stored and run to copy the files into your path
.\CopyToPSPath.ps1
You will receive a message and an error in red text, this is expected. Close your PowerShell window and re-open PowerShell with Administrator permissions
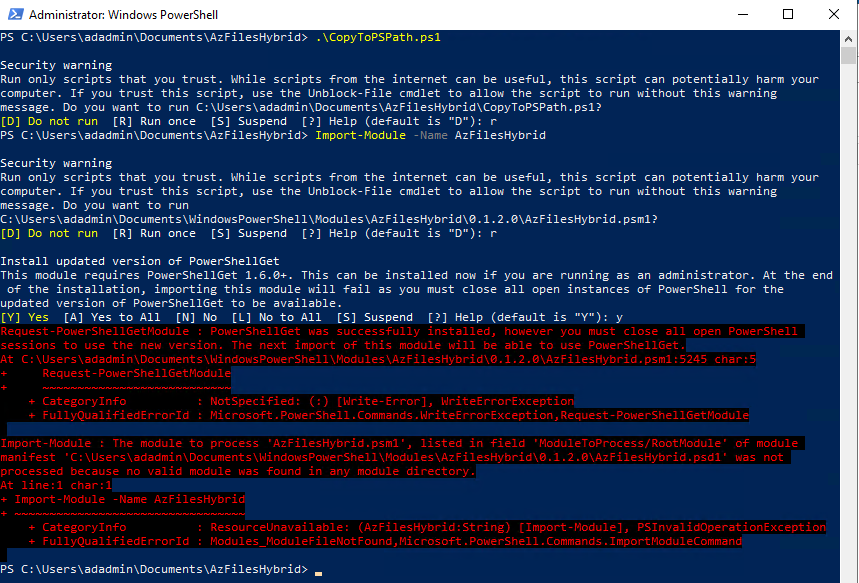
# Import AzFilesHybrid module
# This step will take about 10 minutes to complete.
Import-Module -Name AzFilesHybrid

# Import Azure module
# This step will take about 3-5 minutes to complete.
Install-Module Azure -AllowClobber

# Login with an Azure AD credential that has either storage account owner or contributer RBAC assignment.
Connect-AzAccount

#Define parameters
$SubscriptionId = "<your-subscription-id-here>"
$ResourceGroupName = "<resource-group-name-here>"
$StorageAccountName = "<storage-account-name-here>"

# Select the target subscription for the current session
Select-AzSubscription -SubscriptionId $SubscriptionId -Default

# Register the target storage account with your active directory environment under the target OU (for example: specify the OU with Name as "UserAccounts" or DistinguishedName as "OU=UserAccounts,DC=CONTOSO,DC=COM").
# You can use to this PowerShell cmdlet: Get-ADOrganizationalUnit to find the Name and DistinguishedName of your target OU. If you are using the OU Name, specify it with -OrganizationalUnitName as shown below. If you are using the OU DistinguishedName, you can set it with -OrganizationalUnitDistinguishedName.
# You can choose to create the identity that represents the storage account as either a Service Logon Account or Computer Account, depends on the AD permission you have and preference.
Join-AzStorageAccountForAuth `
        -ResourceGroupName "<resource-group-name-here>" `
        -Name "<storage-account-name-here>" `
        -DomainAccountType "ComputerAccount" `
        -OrganizationalUnitName "<ou-name-here>"
3. Confirm that the feature is enabled
You can check to confirm whether the feature is enabled on your storage account, you can use the following script:
# Get the target storage account
$storageaccount = Get-AzStorageAccount `
        -ResourceGroupName "<your-resource-group-name-here>" `
        -Name "<your-storage-account-name-here>"

# List the directory service of the selected service account
$storageAccount.AzureFilesIdentityBasedAuth.DirectoryServiceOptions

# List the directory domain information if the storage account has enabled AD authentication for file shares
$storageAccount.AzureFilesIdentityBasedAuth.ActiveDirectoryProperties
You’ve now successfully enabled the feature on your storage account. Even though the feature is enabled, you still need to complete additional actions to be able to use the feature properly.
[!INCLUDE storage-files-aad-permissions-and-mounting]
You have now successfully enabled AD authentication over SMB and assigned a custom role that provides access to an Azure file share with an AD identity. To grant additional users access to your file share, follow the instructions in the Assign access permissions to use an identity and Configure NTFS permissions over SMB sections.
Update AD account password
If you registered the AD identity/account representing your storage account under an OU that enforces password expiration time, you must rotate the password before the maximum password age. Failing to update the password of the AD account will result in authentication failures to access Azure file shares.
To trigger password rotation, you can run the Update-AzStorageAccountADObjectPassword command from the AzFilesHybrid module. The cmdlet performs actions similar to storage account key rotation. It gets the second Kerberos key of the storage account and uses it to update the password of the registered account in AD. Then it regenerates the target Kerberos key of the storage account and updates the password of the registered account in AD. You must run this cmdlet in an AD domain joined environment.
#Update the password of the AD account registered for the storage account
Update-AzStorageAccountADObjectPassword `
        -RotateToKerbKey kerb2 `
        -ResourceGroupName "<your-resource-group-name-here>" `
        -StorageAccountName "<your-storage-account-name-here>"
- In the Azure Portal, select your storage account.
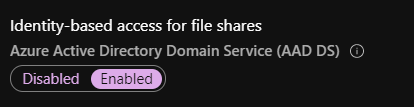
- Select Configuration from the left pane under Settings, then enable Identity-based access for file shares Azure Active Directory Domain Service (AAD DS) in the main pane. Confirm this change by selecting Save.